
Mr2 Staging Brake Installation Guide
Here we show you guys a step by step guide on installing your new staging brake kit for the Mr2 SW20 chassis. We consider this install fairly straight forward and should take less then 30 minutes to complete. If you have any other questions, please do not hesitate to reach out to us via email or phone.
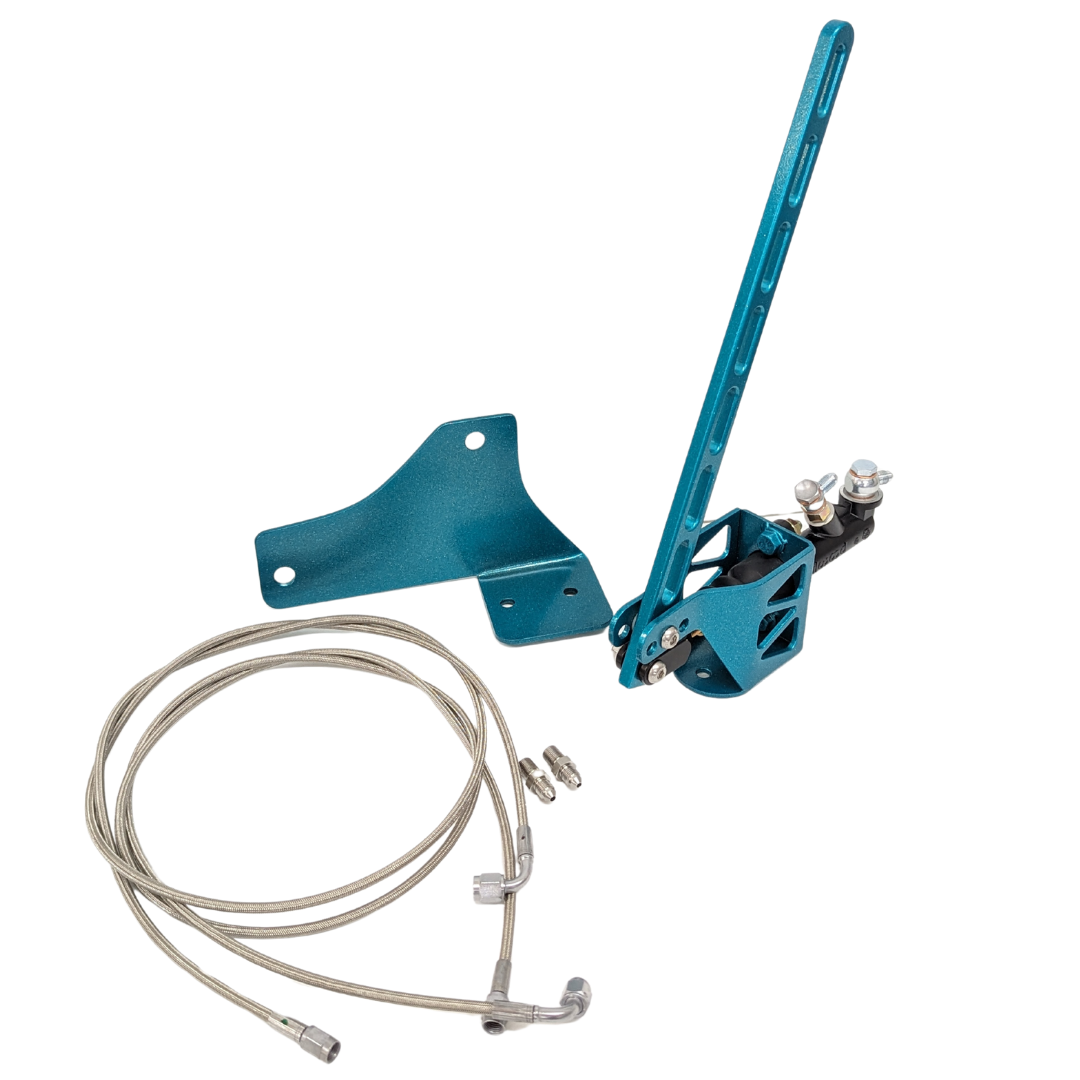
This is what you should have received. Included in your kit is everything needed besides brake fluid. Your kit will come without the handle attached to the master cylinder mount as we do this for shipping purposes. You will see in your hardware bag (2) M8 allen head screws along with nylon washers. You will need to install 1 allen head screw thru one of the holes on the master cylinder bracket (we recommend the middle hole if using the OEM e-brake slot on your center console). Once you have inserted the screw, you need to attach 1 of the nylon washers, then have the screw go thru the top hole on the handle, which then follows another nylon washer, and then passing thru the master cylinder bracket, which then you will install the provided lock nut. You do not need to tighten this lock nut as tight as possible, just enough to where you can still move the handle, but not to loose.

After removing your OEM e-brake assembly, you will install the mounting plate using the oem studs and nuts from your stock brake assembly.
Next, If you are running carpet, you will need to cut a slit for the handle to pass thru as well as the base of the bracket that the master cylinder bracket will mount to as well. If you are not running carpet you will omit this step. Now slide the handle thru the carpet and mount the master cylinder assembly to the brake mounting plate using the provided (2) M8 bolts. (YOU WILL NOT HAVE THE MASTER CYLINDER INSTALLED YET, UNTIL YOU BOLT THE 2 BOLTS THAT HOLD THE MASTER CYLINDER BRACKET TO THE BRAKE PLATE)

Once you have the (2) M8 bolts fully tightened you can now slide the master cylinder onto the 2 mounting studs and hand tighten the nuts. Now temporarily install the provided M8 allen head screw thru the clevis and the lower hole on the brake handle "DO NOT INSTALL THE LOCK NUT JUST YET". The reason we recommend not final installing just yet is because you will have to adjust the clevis to get the appropriate amount of pressure required to lock up the front wheels. These kits do not come pre adjusted. With threading the clevis further onto the master cylinder, this DECREASES the amount of pressure applied to the front wheels. With the clevis not being threaded as much on the master cylinder, this INCREASES the pressure applied to the front wheels.

Now you will remove the OEM hardline that runs from your OEM master cylinder to the brake line distribution block. After removing this line you will install the provided stainless steel fittings. 1 fitting will go into the oem master cylinder and the other fitting going into the distribution block. We have found that on the fitting going into the distribution block, it may need a light coat of PTFE paste on the threads. "DO NOT USE TEFLON TAPE AS THIS CAN GET INTO YOUR BRAKE SYSTEM".

Now it is time to install your steel braided lines. Both lines are the same length and both have 90* and straight fittings. The 90* fittings will go onto the stainless steel fittings you just installed. The line that is connected to your OEM master cylinder will run to the straight port on the wilwood master cylinder. And the line running from the distribution block, will run to the 45 degree port on the wilwood master cylinder. 

Now you will follow your normal brake bleeding procedures with starting from the caliper furthest away from the master cylinder. Once all 4 calipers have been bled with no air bubbles, you will then bleed the wilwood the same way as if it were a brake pedal. There may be very minimal air bubbles as this is a pass-thru style. Once you are finished with bleeding, check to see if the brake will lock up the front wheels. If it does not, then remove the M8 allen screw we temporary installed going thru the clevis, remove the 2 nuts holding the wilwood master cylinder on, and slide the master cylinder out and make your clevis adjustment. Repeat this process until the front wheels are locking up like you want them to. Once you have the clevis adjusted properly, simply install the wilwood back onto the bracket, tighten the provided M8 nuts, the wilwood lock nut going against the clevis, reinstall the M8 allen screw and the provided lock nut. You WILL NOT tighten the lock nut as much as you can. Just snug enough to where the allen screw will not come out. There will be play in between the clevis and the brake handle. This is normal!
This should conclude your staging brake installation. If you have any questions or comments, please reach out to us and we will do our absolute best to answer any and all of your questions.